Update Tips for Stable Solar Tracking with DWARF II
1. Ensure the telescope body is as level as possible.
2. When tracking the sun, keep the telescope cylinder facing the side with the Dwarflab logo (not the battery compartment side).
3. Avoid calibrating or performing panoramic shots before tracking the sun (when the motor needs to move to the axis limit positions for position calculations). If you have performed any of these actions, restart before tracking again.
4. Most importantly, make sure you are using the latest App and firmware .
1. Some Basics to Learn
DWARF II owners, A big welcome to today's eclipse observation walk through with DwarfLab! So you know what we are gearing up together for--the upcoming total solar eclipse on April 8, 2024. With the path of totality passing through Mexico, the United States, and southeastern Canada, partial eclipse coverage will extend over the entire North American continent, as well as the northwest of South America and the western side of Europe, this eclipse will be unprecedented in scale for sure. Nearly all residents of the western hemisphere will have the opportunity to witness this eclipse, potentially making it the most widely observed celestial event in history!
If you happen to be in these locations at that time, or if you plan to travel there, you will need this customized checklist!
Credit: https://solarsystem.nasa.gov/ | Eclipse will cover almost the entire western hemisphere.
Credit: http://xjubier.free.fr/en/site_pages/solar_eclipses/TSE_2024_GoogleMapFull.html | Durango, Mexico, is the center of this eclipse, with an astonishing duration of 4 minutes and 28 seconds!
If you're not quite sure what a solar eclipse is, please refer to the illustration below:
Credit: sciencenotes.org
Strongly recommend watching " Solar Eclipse 101 " produced by National Geographic:
2. Choose Your Observation Location
Genius astronomer Xavier M. Jubier collaborated with NASA scientists to create a map relevant to this eclipse, providing enthusiasts with free access.
By entering your location in the search bar, you can accurately obtain the latitude and longitude of your location, (which facilitates your polar alignment), the extent of eclipse coverage (with illustrations), the start/end time, total duration, and times for each phase (C1-C2-MAX-C3-C4, making it easy for you to set timers and wear solar filters in advance, detailed explanations provided in Chapt.6), basically all the information you need can be found here.
Credit: http://xjubier.free.fr/en/site_pages/solar_eclipses/TSE_2024_GoogleMapFull.html | Even marked with the sunset time if the eclipse coincide with it in your place
Credit: https://stellarium.org/ |Using Stellarium, you can obtain simulated images of the eclipse for your area and obtain a rough time of the phases. Due to the sun being in an active phase, sunspots are clearly visible.
If you're lucky enough to live in the path of totality, this spectacle will naturally unfold right in your backyard or just a few blocks away at a starry sky party! Alternatively, if you're planning to take flights just to witness this grand show, now is the time to book your tickets and venues! We've also found some useful website you might want to check out:
Credit: highcamp.com|Easily find and book observation locations and hotels located along the eclipse path.
When selecting your spot, don't forget to check the weather forecast (even historical data) as many areas can be quite cloudy in April!
3. Essentials You Need to Take With
Based on past experiences, you'll need a collapsible universal tripod(better with a leveling bubble), solar viewing glasses, a large-capacity portable power bank (with an extended charging Type-C cable), as well as camping equipment such as a water bottle, hat, umbrella and small stool. If not cozy, at least stay warm and hydrated during the exciting event!
Credit: amazon.us
4. Easily Capture the 2024 Total Solar Eclipse with DWARF II.
Those fortunate enough to have witnessed this cosmic spectacle in the past have described it as an indescribable, most spectacular, and once-in-a-lifetime experience, reminds us of our place in the universe and the beauty and wonders that surround us every day...anyways, you don't want to miss those several minutes when it comes.
But, you know, the urge to record it when a special event comes can become so strong, and it would be quite regrettable not to leave behind memories!
Thus, a fully automatic, highly integrated, intelligent astronomical telescope DWARF II , which integrates tracking, imaging and processing, is your best choice for capturing the eclipse!
Traditional astronomical telescopes (with cameras and tracker), DSLR cameras (with telephoto lenses and tracker) and DWARF II Smart Telescope:
As the most portable smart telescope on the market, DWARF II has the size of a dictionary and weighs less than two pounds, making it easy for you to carry it on a plane or in the backseat of your car. With its built-in rotatable celestial tracking base and 675mm long-focus dual lenses, you can easily locate and track the sun. The package also comes with a magnetic sun filter for reliable attachment and easy removal. Combined with the user-friendly DWARFLAB App, a few minutes of simple setup allows you to track and record the entire eclipse process and share it instantly with just one click on your phone. With DWARF II , fully enjoy this universe show without the hassle of fumbling with your camera halfway through!
DWARF II Astronomy Photography Demonstration
5. How to Capture the Sun Using DWARF II
5.1 Set Up and Level
Position DWARF II as level as possible. The flat design of DWARF II ensures more precise automatic tracking.
Wear 2 ND filters now to protect the sensor from blinding by sunlight. Do not look directly at the sun for we will not take any responsibility for any harm this may cause.
5.2 Powering On and Connecting
Briefly press the power button to turn on the device, while holding it down will turn off the device.
Click on "Connect" and follow the prompts to connect to DWARF II.
5.3 Locate the Sun and Focus
Face the lenses approximately towards the sun , then use dual-lenses locating or the joystick to center the sun in the tele photo view.
*Please note due to the absence of calibration in this process, it is very important to keep the lens cylinder face to the front side (DWARFLAB MARK) while tracking the sun and moon.
*Dual Lenses Locating: Switch to and double-click the wide-angle view moves the green frame indicator (telephoto view). This feature allows you to locate and quickly focus on objects in the wide-angle lens, like birds in the backyard, pedestrians on the street, or celestial bodies in deep space.
For more about dual lens control, refer to here. Switch to the telephoto lens and click auto-focus. Dwarf II will automatically detect the sun and apply the best settings(brightness) for it.
5.4 Perform Tracking and Settings
Activate 'Function-Feature-Sun Track'. The camera will calibrate (move up a little, don't panic) and then track the sun.
In tracking mode, the sun remains centered, allowing continuous observation or shooting videos/time-lapses.During auto-focus, the camera auto-adjusts parameters, if you may know, typically at 1/600s-1/150s exposure, gain at 0, and IR Cut. Do adjust Hue and WB as preferred. Adjusting the appropriate white balance can present the Sun in different shades of yellow, such as egg yolk or creamy yellow. If you want to manually focus, you can use two fingers to zoom in on the screen and use sunspots as a reference for precise focusing.
5.5 Start Imaging
Tap the 'Shoot' button to take pictures of the Sun.If you want to capture dynamic footage of the sun, you can select the 'Video' mode.
And if you want to record the sun's movement over time, you can choose 'Time Lapse' mode.
The above is the complete process for photographing the Sun. You can practice it a few times in advance to familiarize yourself with the shooting process.
*Note: When you switch the app to the background or disconnect, the shooting process will still continue.
6. How to Capture the Solar Eclipse Using DWARF II
From Chapt. 1 we already know, depending on your location, you may experience a partial or total eclipse during this event.
Credit: See watermark|Partial Eclipse, Annular Eclipse, Total Eclipse
6.1 Penumbra Region(Partial Eclipse Zone)
Credit: AstroXperiences|Partial Eclipse Process
If you are in the penumbra region experiencing a partial eclipse, same as imagining the sun, you can follow the tutorial in Chapter 5 to record the partial eclipse process. Here's a summary :
Setup and level the unit
Wear solar(ND) filters
Power on and connect to your phone
Use the dual-lens and joystick to locate and center the Sun in the wide-angle view
Switch to the telephoto view and click "Focus" for automatic or manual focusing
Adjust appropriate parameters and hues in the "FUNCTION" menu
Once prepared, enter your preferred shooting mode
Click "FUNCTION-FEATURE" and select the sun tracking function
Configure settings such as shooting duration
Click shoot to start imaging
1. Recommended parameters: Since you won't experience totality, which means a portion of the sun will always be exposed, making it impossible to remove the filters, so during the entire partial eclipse process, you don't need to adjust any parameters. You can set the expo between 1/600s to 1/150s and gain 0 throughout. Remember, longer exposures may result in blurrier images with less detail, while shorter exposures may result in darker images with poorer quality. The specific parameters depend on the state of the sun during the eclipse in your location. You can check the local time of the eclipse in your area beforehand, go out and take some test shots at the same time, and choose and remember your preferred parameters!
2. Shooting mode: We recommend using time-lapse mode, as it can effectively capture the entire process.
*If you want to remove the filters to record totality, we suggest setting intervals of 3-5 seconds. If you're not removing the filters, intervals of 30-60 seconds are recommended. An infinite total duration is also a good choice. If the eclipse lasts for two hours, the resulting footage should be within 15GB.
*If you want to use the video mode(full-frame), make sure to have a cleared memory card! It is estimated that a two-hour video will occupy around 50GB of memory. We recommend using a 128GB memory card, as DWARF II supports memory cards up to 512 GB.
3. Eclipse Works:
A beautiful egg yolk, with the clouds adding a dreamy atmosphere⛅️. Check the weather forecast to see if your location will also be cloudy on April 8th. Fingers crossed for no rain.
2023 annular eclipse captured using DWARF II by @ScottCAstrophotography.
From @Kelly Cr, a time-lapse demonstration of the annular eclipse captured using DWARF II
6.2 Umbra Region(Totality Path)
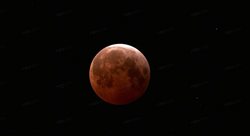
If you're planning to observe the total solar eclipse within the path of totality, then you're truly fortunate! As an enthusiast myself living in the east counter, I can only offer some tips to you and hope to get feedback from the frontline!If you wish to get a shot like below, follow the instructions provided in Section 6.1 . Keep your solar filters on throughout the event, and maintain the same settings recommended.
Credit: Mark Tegethoff via Unsplash | Eclipse taken with filters
Credit: en.nikon.ca | Solar corona.
Or something like this:
Credit:sciencenotes.org|Diamond ring and Baily's beads.
Diamond Ring Effect: This occurs just before and after totality when a small sliver of sunlight shines through the valleys and mountains on the edge of the moon, creating a brilliant flash resembling a diamond ring.
Baily's Beads: As the moon moves across the sun, beads of sunlight can shine through the valleys along the moon's edge, creating a string of bright spots known as Baily's Beads.
Solar Corona: During totality, the sun's outer atmosphere, known as the corona, becomes visible. This wispy, delicate structure is usually hidden by the sun's bright glare but becomes visible during a total solar eclipse.
These are some of the most captivating moments during a total solar eclipse, if you intend to capture them, please review the following instructions ⚠️The following content is an explanation in detail, and may be challenging to understand. If you prefer to receive direct operating instructions, skip to Section 6.2.2-Operation Guide ⚠️
6.2.1 Introduction of Total Solar Eclipse Process
As shown in the diagram below, depending on the degree of blocks, a total solar eclipse can be divided into several phases: C1-C2-Max-C3-C4 .
Credit: solareclipseguide.com
C1: Start of the partial eclipse process.
C2: Time when the partial eclipse transitions to total eclipse (marked by the disappearance of the diamond ring and Baily's beads, and the appearance of the solar corona).
Max: Maximum eclipse, when the Sun is completely covered by the Moon (allowing observation of the solar corona).
C3: Time when the total eclipse transitions back to partial eclipse (marked by the disappearance of the solar corona and the reappearance of Baily's beads and the diamond ring).
C4: End of the partial eclipse process.
We provide the following shooting guidance based on the phases above, aka what you should do in those different times :
1. C1: The Sun is in a partial eclipse state. Assuming you are using DWARF II for time-lapse photography, keep it in tracking mode with fixed parameters.
2. Before C2: About 1 minute before C2 starts, shadow bands appear on the ground, indicating that it's time to remove the solar filters!
**If you wish to switch to video mode or burst mode now, stop tracking - switch mode - set shooting parameters - reenter tracking- start shooting
Credit: WikiPedia | People lay white sheets on the ground to observe the shadow bands. More on:https://en.wikipedia.org/wiki/Shadow_bands
About 15 seconds before C2 starts , the edge of the Sun will show the Diamond Ring, which will then quickly transition into Baily's Beads. Allowing 5 seconds for adjusting parameters and removing the filters so next, proceed with the following steps about 20 seconds before C2 begins :A. Reduce the exposure to about 1/1000s to capture the details of the diamond ring and Bailey's beads (quickly tap FUNCTION and swipe left).B. Remove the solar filters.
Credit: Quora.com | The Diamond Ring - Baily's Beads - Solar Corona in a total solar eclipse
*When removing the filters, hold the telescope with one hand and remove the filters with another, ensuring to maintain the stability of the unit as much as possible!
3. C2: In approximately 15 seconds the diamond ring and Bailey's beads will disappear, the Sun is completely covered, and the solar corona appears. The C2 phase has begun! Quickly adjust the exposure to about 1/100s to capture the solar corona, then ⚠️remove your safe glasses⚠️to observe the total eclipse!
You need to maintain this exposure setting to capture the solar corona until C3 begins . In other words, all images taken between C2, Max, and C3 will be of total coverage and the solar corona. Take Dallas area as an example. The totality lasts about 3 min 51 sec.
4. Max: At this point, the sun is most obscured, and you wouldn't want to miss this part. Look towards the horizon, and you may even see Venus and Jupiter!
**During this process, do not operate the camera and focus solely on observing the total eclipse even if you feel the shooting is messed up.
5. C3: Baily's beads will reappear shortly. Quickly put your glasses back on! If you still want to capture Baily's beads, you can quickly reduce the expo, then grab your filters and after another 15 seconds, you can start wearing them (allow 5 seconds for wearing), and once you have the filters on, readjust the exposure to partial eclipse settings.
6. C4: Partial eclipse continues till the end of contact.
6.2.2 Operation Guide
So, to summarize:
Credit: Penn State Behrend
During the entire period from C2 (Totality Begins) - 15s to Max Totality to C3 (Totality Ends) + 15s, you can keep the filters removed for shooting. During this period, it is recommended to adjust the exposure settings shorter to capture details: around 1/1000s for shooting the diamond ring and Baily's beads, about 1/100s for shooting the solar corona.
The period for observing the eclipse with your naked eye is during C2-Max-C3 .
The above time descriptions are for explanation and preparation purposes. You can set up timers in advance according to the timing provided by the eclipse map in Chapter 1 . For example, set a timer about 1 minute before C2 to remind you to switch modes(if preferred), adjust parameters, and remove the filters. However, we recommend performing actions based on eclipse phenomena such as diamond rings as well as corona, as too many settings may lead to confusion, of course---
「When shadow bands appear, adjust the parameters (switch modes) - then wait for the appearance of the diamond ring or Baily's beads, remove the filters, and capture Baily's beads with appropriate parameters; next, when the solar corona appears, adjust the exposure parameters again, then keep the DWARF II sit there and observe the eclipse; when the totality ends and Baily's beads reappear, adjust the exposure and prepare to wear the filters, adjust the exposure again when the partial eclipse begins.」
If you want to capture a series of images or continuous video of the solar eclipse, you can choose not to remove the filters at all ; if you hope to capture phenomena like Baily's beads and the solar corona during totality, then removing the filter will be necessary, but this may also mean missing the opportunity to shoot continuous video. Therefore, a balance needs to be struck between the two. During the brief period of totality, while enjoying the spectacular sight, capturing Baily's beads and the solar corona is a very challenging task! If possible, I hope you can enjoy the view and maybe record your feelings with your phone instead of being busy removing and wearing the filters and adjusting the exposure. After all, the work with filters is also super cool! However, if you are focusing on serious photography, please practice multiple times and familiarize yourself with the steps according to the tutorial we provide. This will greatly help you achieve satisfactory results during the total solar eclipse.
It's not over yet! Here we have some more tips & news.
7. Tips, FAQs and Roadmap:
Q: Should I polar align or calibrate to make my tracking more accurate?
A: No, DWARF II cannot be calibrated during the daytime. To save you the trouble of polar alignment, the sun tracking algorithm operates under the assumption that the device is in a level position. We will continue to refine the algorithm based on this situation and release a software update in March that will allow continuous tracking for several hours.Additionally, regardless of your location, we recommend setting up DWARF II and entering tracking mode half an hour before the eclipse begins. Since nighttime calibration is not possible, to extend tracking time, you can exit tracking, recenter, and retrack in the last ten minutes before the eclipse starts. **The position of the sun cannot be adjusted or manually centered while in tracking .
Q: How can I record the eclipse with a series of photos?
Update: Burst Mode now online for you!
Burst mode in 'Function-Feature' includes a 'Settings' option.Set the time interval (from 1s to 60s) and the number taken of this set of pictures. Note that there's a brief delay in saving photos after hitting stop on taking the burst. So it might take some time for the photos to show up in the album.
*Note: The change of Interval settings during a shooting session will take effect to make sure you get a better record of a whole imaging process saying totality!
Credit: pentaxforums.com | Using a wide-angle lens or other equipment to capture the horizon can allow for the later composition of some really cool eclipse photos.
**If you want to record a non-full-frame video of totality, whether it's through burst or time-lapse, you must consider setting an appropriate frame interval. It's recommended to set it between 3 to 5 seconds. Too long of an interval may cause you to miss crucial frames. As mentioned earlier, you can start adjusting the appropriate shooting mode or interval settings about 1 minute before C2.
Q: I see quite a lot of recommended parameter sets for eclipse. Should I refer to any for getting advanced results?
A: No, there's no need for complicated parameter adjustments because DWARF II is fixed-focus and fixed-aperture. Our goal is to save you from feeling overwhelmed during the eclipse. With our recommended parameters, you only need to adjust the exposure during totality. We also hope you can enjoy the process, as DWARF II will serve as a competent smart recording tool.
Except for stocking equipment, finding a spot, and checking the weather, don't forget to charge your DWARF II ahead. What's more, take it outside to capture the sun, choose appropriate exposure and your preferred tones and shooting modes at that specific times, pick suitable intervals, and decide whether or not to remove the filters, to do or not to do, huh a very difficult decision to make.Alrighty, that is pretty much all about it. Practice more, only skilled hunters can capture the most beautiful moments. Wishing you a smooth eclipse journey! Plus, April 8th is a Monday, and DWARFLAB believes the total eclipse zone folks should be given a special holiday on that day!
The media and websites referenced in this article are duly credited to their respective creators. All copyrights belong to the original authors. DWARFLAB extends special thanks and respect to these creators for their contributions to astronomy.
I am think along the lines of shooting video and edit the event in post. I don’t know about if I taking the filter off or not. Using a white light filter most likely I can correct most of it in post
Choosing a selection results in a full page refresh.